About Me

My Blinkie
Monday, November 11, 2019
New in stores!
Designer Pack #6

Nice little mix of some Christmas-themed CU elements perfect for your personal use kits.
This pack includes:
10 assorted png's
Large tagger size
CU/PU ok
Purchase here.
Thursday, November 7, 2019

This tutorial was written by me on November 7th, 2019 and is my own creation. Any resemblance to any other tutorial is purely coincidental and unintentional.
PSP Version used: PSP 2019
This tutorial assumes you have a good working knowledge of PSP.
Supplies:
Tube of choice. I am using the art of Nocturne. You can purchase her tubes here.
PTU kit from Drea’s Designs called Under the Stars.

You can purchase it here.
Mask 404 by Vix. You can find it here.
Font of choice. I am using Sugar & Spice.
Filters:
Mura Meister Copies
Xero Porcelain
-------------------------------------------------------------------------------
Open element 116. Resize by 60%, all layers unchecked. Now resize all layers by 74%. Rotate slightly to the left.
Open your mask & Paper15. Resize your paper by 80%. Paste as a new layer onto your frame canvas. Move below the frame layer. Apply your mask, merge group. Add noise, random, 75, monochrome checked.
Open Paper10. Resize by 75%. Paste as a new layer above the mask layer. On your frame layer, use your magic wand & click inside the frame. Selections, modify, expand by 10. On the paper layer, selections, invert & press delete. Deselect.
Open element 54. Resize by 40%. Paste as a new layer. Mura Meister Copies, encircle preset. Change the Shift X & Y to 55. Move this layer below the yellow paper layer.
Now let’s add our remaining elements:
111 - resize by 55%. Paste as a new layer above the frame layer. Move a little towards the top.
59 – resize by 20%. Place to the top left corner of the yellow frame.
19 – resize by 50%. Place to the top of the frame.
52 – resize by 40%. Place to the bottom left.
41 – resize by 50%. Place over the green leaves.
79 – resize by 30%. Place to the bottom left.
61 – resize by 30%. Place to the bottom, a bit to the right of the dandelions.
36 – resize by 75%, flip horizontal. Place to the bottom.
43 – resize by 50%. Place to the bottom left.
96 – resize by 30%. Place to the bottom left.
48 – resize by 40%, flip horizontal. Place to the bottom right.
95 – resize by 25%. Place over the right side of the frame.
101 – resize by 40%. Place to the bottom right, but above the stones.
Duplicate the yellow daisy flower. Bring the duplicate to the top, then place to the bottom right of the blue flower.
69 – resize by 30%. Place on the top right of the wordart.
82 – resize by 20%. Place to the bottom right of the envelope.
63 – resize by 40%. Place over the left side of the wordart.
80 – resize by 25%. Place to the left of the tiny marshmallows.
107 – resize by 69%. Paste as a new layer.
Open your tube, resizing as necessary. Paste as a new layer just above the string lights layer. Xero Porcelain using the default settings.
Add your name, copyright, & license info. Apply a drop shadow of choice to your layers, then merge visible. Save as a png.
Thanks for checking out my tutorials.
Thursday, October 31, 2019

This
tutorial was written by me on October
30th,
2019
and is my own creation. Any resemblance to any other tutorial is
purely coincidental and unintentional.
PSP
Version used: PSP 2019
This
tutorial assumes you have a good working knowledge of PSP.
Supplies:
Tube
is
Miss Cookie 60 by
CutenToons.

FTU
kit from MizTeeques Digital Designs called Midnight Desire.


You can
find it here.
Mask
864 by me. You can find it here.
Font
of choice. I am using Pateglamt Script.
-------------------------------------------------------------------------------
Open
element 34. Set the canvas size to 700 x 700. Now resize by 86%.
Open
your mask & paper 5. Resize your paper by 75%. Paste your paper
as a new layer onto your frame canvas. Move your paper below the
frame layer. Apply your mask, merge group. Add noise, gaussian, 75,
monochrome checked.
Open
paper 2 & resize as the previous paper. On your frame canvas, use
your magic wand & click inside the frame. Selections, modify,
expand by 10. Paste your paper as a new layer. Selections, invert, &
press delete. Deselect & move below the frame layer.
Now
let’s add our elements:
16
– resize by 15%. Paste as a new layer above the frame layer. Place
to the top of the frame.
2
– resize by 30%, rotate right. Place to the left side of the bow.
Move below the bow layer. Duplicate, mirror horizontal.
50
– resize by 50%, rotate right. Paste as a new layer above the bow
layer. Place over the left side of the frame. Duplicate, mirror
horizontal.
25
– resize by 25%. Place towards the bottom of the flower stems on
the left.
26
– resize by 20%. Place to the bottom of the lantern. Rotate
slightly to the left.
42
– resize by 25%. Place to the bottom right. Duplicate, mirror
horizontal.
23
– resize by 20%. Place to the bottom right.
5
– resize by 40%. Place to the bottom.
49
– resize by 20%. Place to the right side of the silver flower. Move
below the silver flower. Duplicate, mirror horizontal.
57
– resize by 30%. Paste as a new layer above the silver flower
layer. Place to the bottom of the post card.
35
– resize by 20%. Place to the bottom left of the satchet.
Open
your tube, resizing slightly. Paste as a new layer just below the
frame layer, flip horizontal and place the tube to your liking inside
the frame opening. On your paper layer just below your tube, select
all, float, defloat. On the tube layer, selections, invert &
press delete. Deselect. Duplicate your tube again. Set the blend mode
to screen, 40. On the original tube layer, set the blend mode to
luminance (L), 25.
Paste
your tube again, this time just above the post card layer, resizing
as necessary. Place over the right side of the frame.
Add
your name, copyrights, & if using a PTU tube, license info. Apply
a drop shadow of choice to your layers, then merge visible. Save as a
png.
Thanks
for checking out my tutorials.
Thursday, October 24, 2019
It has been forever since I did any templates for all my tagging fans.
I hope you like them & enjoy!

You can grab them here.
Monday, October 21, 2019
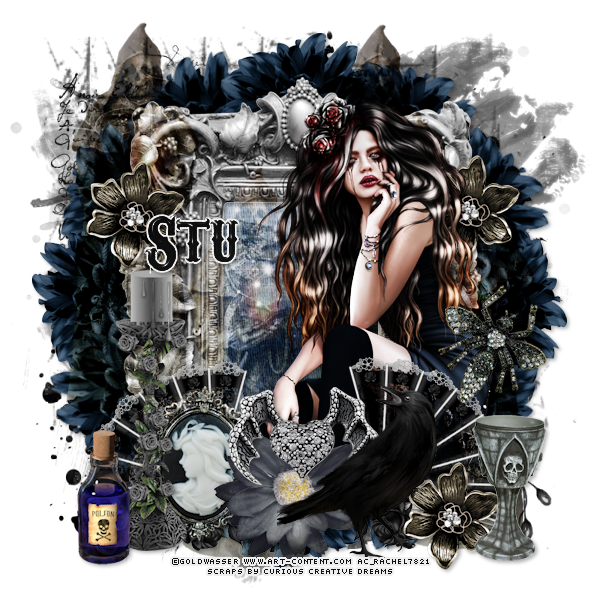
This tutorial was written by me on October 21st, 2019 and is my own creation. Any resemblance to any other tutorial is purely coincidental and unintentional.
PSP Version used: PSP 2019
This tutorial assumes you have a good working knowledge of PSP.
Supplies:
Tube of choice. I am using the art of Goldwasser. You can purchase this tube here.
Kit from Curious Creative Dreams called Dark Angel.

You can purchase the kit here.
Mask 221 by Sophisticat Simone. You can find it here.
Font of choice. I am using Carnivalee Freakshow.
Filters:
Mura’s Meister Copies
EyeCandy 4000 - Glass
-------------------------------------------------------------------------------
Let’s get started.
Open ele48. Set the canvas size to 653 x 653. Resize to 600 px. Resize again, this time by 70%, all layers unchecked.
Open your mask & pap12. Resize by 60%. Paste your paper as a new layer onto your frame canvas. Move below the frame layer. Apply your mask, merge group.
Open ele22. Resize by 50%. Paste as a new layer above the mask layer. Mura’s Meister Copies using the encircle preset. Change both the Shift X & Shift Y to 60.
Open pap9 & resize by 60%. Paste as a new layer. Move a little down & to the right so you see more of the lighter part of the paper inside the frame. With your rectangle selection tool, draw out a selection that is a little bigger than the frame opening. Selections, invert & press delete. Deselect.
Open ele39. Resize by 80%. Paste as a new layer above the frame layer. Duplicate 3 times. Arrange each to your liking. I staggered them over top of the tag. Merge all the duplicates with the original. Set the blend mode to soft light.
Now let’s add our remaining elements:
ele37 – resize by 60%. Place to the lower right corner of the frame. Duplicate, mirror horizontal.
ele33 – resize by 30%. Place to the bottom of the fan on the right hand side. Duplicate & place towards the top of the left side of the frame. Duplicate again & then move below the fan layers. Place towards the top of the right side of the frame.
ele27 – resize by 40%. Place to the bottom, over the fan on the left hand side.
ele6 – resize by 40%. Place to the bottom, between the fans.
ele20 – resize by 60%. Place to the bottom left.
ele10 – resize by 30%. Place to the top of the blue flower.
ele17 – resize by 40%. Place to the right of the blue flower.
ele25 – resize by 50%. Place to the bottom right.
ele26 – resize by 25%. Place just above the chalice. Rotate slightly to the right.
ele42 – resize by 50%. Place to the bottom left of the candle.
Open your tube, resizing as necessary. Paste as a new layer just below the fan layers. Place over the right side of the frame. Erase any part of the tube that hangs below the elements at the bottom.
Duplicate your tube, & set the blend mode to overlay. On the original tube, press Shift+L and change the settings to 0, 0.
Add your name, applying the EyeCandy 4000 Glass settings of your choice. I used the default settings but changed the color of the glass to white. Also you could add a gradient glow around your text.
Add your copyrights, & license info. Apply a drop shadow of choice to your layers, then merge visible. Save as a png.
Thanks for checking out my tutorials.
Sunday, October 20, 2019
I have a couple of new products for the month of October in stores now!
Check them out below!


For the month of October, I have a nice little sale going on - 30% off most everything!
You can check the sale & my products out here.
Thursday, October 17, 2019

This tutorial was written by me on October 16th, 2019 and is my own creation. Any resemblance to any other tutorial is purely coincidental and unintentional.
PSP Version used: PSP 2019
This tutorial assumes you have a good working knowledge of PSP.
Supplies:
Tube of choice. I am using the art of Alec Rud. You can purchase his tubes here.
PTU kit from Crazymoonas Dezinz called Ghouls Night Out.

You can purchase it here.
Mask 111 from Designs by Vaybs. You can find it here.
Template 887 from Millie’s PSP Madness. You can find it here.
Font of choice. I am using Perfume Classic.
Filter:
EyeCandy 4000 – Glass (text)
-------------------------------------------------------------------------------
Open your template. Delete the following layers: 8, 7, & Raster 1. Merge together layers 3 & 4.
Set your canvas size to 800 x 700. Now resize by 75%.
Replace each layer with the following (resize each paper by 86% beforehand):
1 – paper 9
2 – paper 8
3 – paper 11
5 – paper 1
6 – paper 10
Open your mask & paper 3. Resize your paper by 75%. Paste as a new layer above the background layer. Apply your mask, merge group. Duplicate your mask layer.
Open element 10. Resize by 80%. Paste as a new layer above the orange paper layer. Place to the top of your template layers.
Now let’s add our remaining elements:
132 – resize by 40%, rotate left twice. Paste as a new layer above the top layer, then place to the bottom of the green paper layer.
143 – resize by 60%. Place to the top right.
75 – resize by 70%. Place to the top of the green paper layer.
112 – resize by 80%, rotate left. Place over the vine. If you have any of the confetti cut off at the top, just use your eraser tool and erase that.
53 – resize by 40%. Place to the bottom right of the green paper layer.
5 – resize by 50%. Place to the bottom right corner.
68 – resize by 30%, flip horizontal. Place to the right side.
103 – resize by 25%, flip horizontal. Place to the bottom left.
15 – resize by 80%. Place to the bottom.
7 – resize by 60%. Place to the bottom right. Duplicate, then place slightly in from the bottom left.
28 – resize by 50%. Place to the bottom right.
72 – resize by 30%. Place to the left, just below the vine corner.
99 – resize by 15%. Place towards the bottom of the mushrooms. Rotate slightly to the right.
73 – resize by 25%, flip horizontal. Place over the corner of the vine.
59 – resize by 30%. Place towards the top right. Rotate slightly to the right.
86 – resize by 50%. Place to the bottom left.
70 – resize by 25%. Place to the bottom left of the lollipop.
89 – resize by 25%. Place to the right of the poison.
61 – resize by 25%. Place between the poison & the cupcake.
65 – resize by 25%. Place to the right of the pumpkin.
Open your tube, resizing slightly. I resized by 80%. Paste as a new layer above the green paper layer. Flip horizontal. Arrange over the paper layer and then when satisfied with placement, on the paper layer, select all, float, defloat. On the tube layer, selections, invert & press delete. Deselect. Set the blend mode for your tube to soft light.
Paste your tube again, this time above the orange ribbon layer, resizing as necessary. Place over the right side of the green paper layer.
Apply a drop shadow to your layers of choice. Right click over your layers palette, merge, merge visible to new layer. On the merged layer, set the blend mode to overlay, 65.
For your text, set your foreground to #d14100 & your background to #f4d33e. Set your background to a linear gradient, repeats & angle set to 0. Type your name out & apply. Here you can add your glass effect, using the default settings but changing the glass color to white.
I also added a gradient glow, color is #f8fafb.
Merge visible & save as a png.
Thanks for checking out my tutorials.
Subscribe to:
Posts
(Atom)