About Me

My Blinkie
Thursday, November 26, 2020

This tutorial was written by me on November 26th, 2020 and is my own creation. Any resemblance to any other tutorial is purely coincidental and unintentional.
PSP Version used: PSP 2020 Ultimate
This tutorial assumes you have a good working knowledge of PSP.
Supplies:
Yuriko Shirou Bundle Package 17 (includes both tube & kit)

You can purchase it here.
Font of choice. I am using Feeling Passionate Regular.
Filters:
Xero Radiance
-------------------------------------------------------------------------------
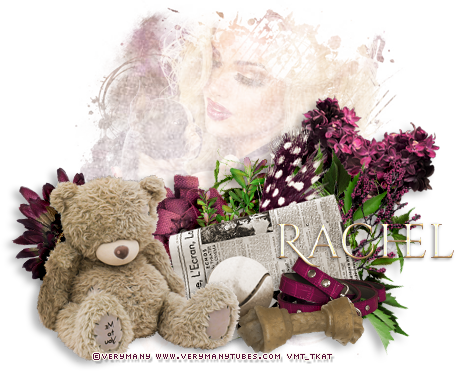
Open element 32. Set the canvas size to 821 x 821 px. Resize your frame by 70%, all layers unchecked. Now resize all layers by 73%.
With your magic wand tool, click inside the frame. Selections, modify, expand by 10.
Open paper 5. Resize by 67%. Paste as a new layer onto your frame canvas. Selections, invert & press delete. Move the paper below the frame layer.
Open element 20. Resize by 69%. Paste as a new layer & move below your paper layer.
The remaining elements will be above your frame layer:
33 - resize by 50%. Place over the left side of your frame.
47 - resize by 25%. Place over the leaves, just a bit down from the top.
36 - resize by 20%. Place over the upper right corner of the frame. Duplicate & move to the bottom left.
25 - resize by 20%. Place to the bottom right of the upper right rose. Flip horizontal. Duplicate & place to the bottom right of the duplicate rose, flip horizontal.
23 - resize by 25%. Place to the bottom right.
35 - resize by 50%. Place to the bottom.
40 - resize by 40%. Place over the lace.
48 - resize by 35%. Place to the bottom left. Move the duplicate rose so it peeks out from the bottom left of the books. On the duplicate white flower, move above the books layer so it's a little down & to the right of the rose.
26 - resize by 57%. Paste above all the other layers & place a little to the right.
Open your tube, resizing as necessary. Paste as a new layer above the original single white flower layer.
Xero Radiance using the following settings:
Strangeness - 161
Charm - 112
Truth - 118
Beauty - 152
Apply a drop shadow of choice to your layers.
Hide the bottom element, then merge visible. On the merged layer, objects > align > center in canvas. Unhide the bottom element.
Add your name & copyright info. Apply a gradient glow to both, then your drop shadow.
Merge visible & save as a PNG.
Thanks for checking out my tutorials.
Monday, October 12, 2020

Tuesday, October 6, 2020

This tutorial was written by me on October 6th, 2020 and is my own creation. Any resemblance to any other tutorial is purely coincidental and unintentional.
PSP Version used: PSP2020 Ultimate
This tutorial assumes you have a good working knowledge of PSP.
Supplies:
Tube of choice. I am using the art of Eskada. You can purchase it here.
Kit by Wicked Princess Scraps called Witchy Way

You can purchase the kit here.
Halloween Mask 06 by Toxic Desirez. You can find it here.
Font of choice. I am using Nowharehouse.
-------------------------------------------------------------------------------
Ok let's get started!
Open Frame 9. Set the canvas size to 600 x 600. Resize by 70%, all layers unchecked.
Open your mask & Paper 16. Resize your paper by 75%. Paste as a new layer onto your frame canvas, then move below the frame layer. Apply your mask, merge group. Add noise, gaussian, 25, monochrome checked.
On your frame layer, use your magic wand and click inside the frame. Selections, modify, expand by 5.
Open Paper 4. Resize by 75%. Paste as a new layer onto your frame canvas. Selections, invert & press delete. Deselect & move below the frame layer.
Open Web1. Resize by 60%. Paste as a new layer above the paper layer. Arrange to your liking over the paper layer. On the paper layer, select all, float, defloat. On the web layer, selection, invert & press delete. Deselect.
Now let's add our remaining elements:
Cloud - resize by 85%. Paste as a new layer above the frame layer. Place towards the top of the frame.
Bird - paste as a new layer. Place towards the top of your frame.
Doll - resize by 40%. Place along the top right of the frame.
Flower10 - resize by 60%. Place to the bottom right. Duplicate, mirror horizontal. Move the duplicate slightly higher than the original.
Flower14 - resize by 30%. Place over the original black flower, a little down & to the left of the center of the flower. Duplicate & repeat for the duplicate black flower, but reverse the direction of the placement.
Board - resize by 60%. Place to the bottom left.
Cup2 - resize by 40%. Place to the bottom left of the board.
Skull2 - resize by 40%, flip horizontal. Place to the bottom right.
Skeleton - resize by 50%. Place to the bottom, at the right edge of the board.
Herbs4 - resize by 60%. Place to the bottom center.
Scroll2 - resize by 30%. Place to the bottom left of the skull.
Bottle3 - resize by 30%. Place over the left edge of the scroll.
Wordart - resize by 46%. Place to the bottom.
Set your foreground to #eeefee & your background to #8ac0e9. Click on your foreground color & click on the gradient tab. Select the Foreground/Background gradient, angle 34, repeats 4.
On your wordart layer, select all, float, defloat. Selections, modify, expand by 2. Add a new raster layer & floodfill with your gradient. Deselect. Add noise using the previous settings. Move the fill layer below your wordart layer. On the wordart layer, merge down.
Open your tube, resizing as necessary. Paste as a new layer above the duplicate purple flower layer & center over the frame opening. Erase any part of the tube that extends past the bottom of the herbs. Duplicate your tube, gaussian blur 3.00. Set the blend mode to Overlay.
Add your name, copyright, & license info. I place the name just below the original tube layer & added a faux gradient glow in the foreground color as we did with the wordart.
Apply a drop shadow of choice to your layers, then merge visible. Save as a png.
Thanks for checking out my tutorials.
Sunday, September 27, 2020


Thursday, September 24, 2020


Friday, September 11, 2020

Saturday, September 5, 2020

This tutorial was written by me on September 5th, 2020 and is my own creation. Any resemblance to any other tutorial is purely coincidental and unintentional.
PSP Version used: PSP 2020 Ultimate
This tutorial assumes you have a good working knowledge of PSP.
Supplies:
Tube of choice. I am using the art of Kajenna. You can purchase her tubes here.
PTU kit from Doodle By Design called Falling For Autumn

You can purchase the kit here.
Mask 381 from Weescotslass Creations. You can find it here.
Font of choice. I am using Feeling Passionate.
-------------------------------------------------------------------------------
Open Frame 2. Resize by 65%, all layers unchecked. Resize all layers by 92%, then set the canvas to 600 x 550.
Open your mask & Paper 9. Resize your paper by 67%. Paste your paper as a new layer onto your frame canvas. Move below the frame layer. Apply your mask, then merge group.
Open Paper 14 & resize by 67%. Copy. On the frame layer, use your magic wand & click inside the frame. Selections, modify, expand by 10. Paste your paper as a new layer. Deselect & move below the frame layer.
Ok now let's add our elements:
19 - resize by 70%. Paste as a new layer above the frame layer. Place to the top of the frame.
52 - place over the curtain.
98 - resize by 40%. Place over the grass spray.
10 - resize by 40%. Place to the bottom right. Rotate slightly to the right.
113 - resize by 55%. Place to the bottom of the sign, then a little to the left.
74 - resize by 20%. Place to the bottom, a little to the left.
12 - resize by 35%. Place to the bottom left of the sign.
106 - resize by 20%. Paste as a new layer just above the bottom grass layer. Place just above the first two squash in the basket. Duplicate & place to the inside edge of the left side of the frame. Duplicate, flip horizontal & place up & a little to the left of the previous leaf. See my tag for reference.
111 - resize by 30%. Paste as a new layer above the basket layer. Place to the bottom left.
62 - resize by 80%. Place to the bottom.
71 - resize by 15%. Place to the bottom left of the second leaf.
100 - resize by 20%. Place over the last 2 leaves.
36 - resize by 25%. Place to the bottom left. Rotate a little to the left.
28 - resize by 30%. Place to the right of the heart.
57 - resize by 25%. Place to the right of the basket.
Duplicate the black & white fabric flower & move to the top layer. Place to the bottom right of the yellow rose. Duplicate again & place to the top of the sign.
116 - paste as a new layer & place a little down to the bottom.
Open your tube. Resize as necessary & paste as a new layer above the sign layer. Center over the frame opening.
Hide your mask layer.
Apply a drop shadow of choice to your layers, then merge visible.
Unhide your mask layer. Then on the merged layer, Objects, align, center in canvas.
On your mask layer, use your pick tool & resize slightly by clicking on the top left corner & dragging inward toward the center. Object, align, center in canvas.
Add your name, then a drop shadow for your name. Add your copyright & license info.
Merge visible & save as a png.
Thanks for checking out my tutorials.
Subscribe to:
Posts
(Atom)