This tutorial was written by me on April 26th, 2020 and is my own creation. Any resemblance to any other tutorial is purely coincidental and unintentional.
PSP Version used: PSP 2019
This tutorial assumes you have a good working knowledge of PSP.
Supplies:
PTU kit from Crazymoonas Dezinz called Ma Mere
You can purchase the kit here.
Font of choice. I am using Marmia.
-------------------------------------------------------------------------------
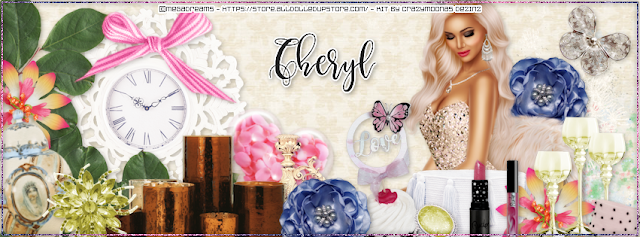
Open a new blank image, 851 x 315.
Open Paper 9. Set your foreground color to pattern & pick your paper from the patterns. Floodfill your canvas with the pattern.
Now we can add our elements:
4 - paste as a new layer & place down & to the far right.
18 - resize by 60%. Place to the left side, a little in from the left edge.
100 - resize by 40%, flip horizontal. Place to the lower left corner. Duplicate, flip horizontal. Place above the original. Duplicate, then rotate slightly to the right. Place to the right of the original. Duplicate again, then place to the right of the previous leaf copy, but move slightly down.
83 - resize by 25%. Place to the right, a little to the left of the right edge. Duplicate, flip horizontal, then place to the bottom center.
17 - resize by 40%. Paste as a new layer above the original blue flower. Place to the bottom, halfway between the top blue flower & the right edge.
85 - resize by 25%. Place to the left edge. Duplicate, then place to the bottom right, directly below the original blue flower.
29 - resize by 30%. Place to the bottom left corner. Rotate slightly to the left.
73 - resize by 50%. Place to the bottom right of the clock. Rotate slightly to the right.
21 - resize by 30%. Place to the bottom of the heart.
30 - resize by 60%. Place to the bottom left of the heart.
22 - resize by 40%. Place to the right side of the duplicate blue flower.
6 - resize by 30%. Place to the bottom right corner.
25 - resize by 15%. Place to the bottom right corner. Rotate a little to the right.
12 - resize by 30%. Paste as a new layer above the duplicate blue flower layer. Place to the right side of the vase.
15 - resize by 25%. Place to right of the cupcake.
24 - resize by 20%. Place to the bottom, between the ring & glasses.
70 - paste as a new layer & place to the top of the clock.
101 - resize by 20%. Place to the top right corner.
Now open the tube from the kit. Paste as a new layer above the original blue flower layer. Place to the right side.
Apply a drop shadow of choice to your layers.
Right click over your layers palette, merge > merge visible to new layer. On the merged layer, gaussian blur 3.00. Set the blend mode to Overlay, 40.
Set your foreground color to #fa89bf & your background color to #374476. Set the foreground to a linear gradient, angle 45, repeats 5, invert checked.
Add a new raster layer & floodfill with your gradient. Select all, selections modify, contract by 2. Selections, invert & press delete. Selections, invert. Selections, modify, contract by 2, then press delete. Deselect.
Add noise, gaussian, 75, monochrome checked.
Add your name, copyrights, & license info if using a different tube. Apply your drop shadow to the frame and your name layer. Merge visible & save as a png.
Thanks for checking out my tutorials.


0 people loved this post!:
Post a Comment