This tutorial was written by me on April 7th, 2020 and is my own creation. Any resemblance to any other tutorial is purely coincidental and unintentional.
PSP Version used: PSP 2019
This tutorial assumes you have a good working knowledge of PSP.
Supplies:
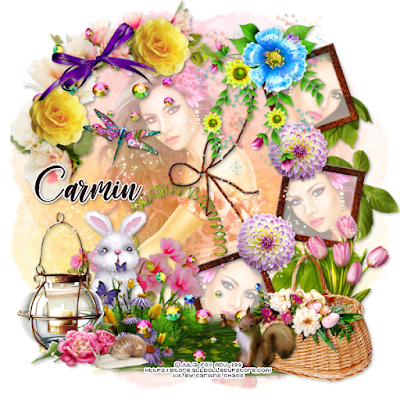
PTU kit from Carmins Chaos called Spring Blooms
You can purchase the kit here.
Mask 7 by HorsePlay’s Pasture. You can find it here.
Font of choice. I am using Georgina Script.
-------------------------------------------------------------------------------
Ok let’s get started!
Open element 89. Resize by 80%, all layers unchecked. Place the frames to the right.
Open your mask & paper 1. Resize your paper by 75%. Paste as a new layer onto your frame canvas. Apply your mask, merge group.
Open element 80. Resize by 80%, flip horizontal. Paste as a new layer above the mask layer. With your pick tool, rotate it a little to the left so it is about the same angle as the frames. Use your eraser tool and erase any part of the vine that is showing on the top of the top frame, left of the top frame. Repeat for the bottom frame.
Open paper 15, resizing by 75%. On the frames layer, click inside each frame. Selections, modify, expand by 5. Paste your paper as a new layer. Selections, invert & press delete. Deselect & move just below the frames layer.
Now let’s add our remaining elements. If you’re unsure of placement, just use my image as a reference.
9 – resize by 40%, flip horizontal. Move this layer just above the vines layer. Place to the bottom.
92 – resize by 60%, flip horizontal. Paste as a new layer above the frames layer. Place to the top left corner of the mask.
2 – resize by 40%. Place to the left of the bottom frame.
94 – resize by 30%. Place over the pink flowers, a little to the left of the center point.
4 – resize by 60%. Place to the bottom.
91 – resize by 40%. Place to the bottom. Duplicate & place over to the pink flower spray.
65 – resize by 15%, flip horizontal. Place over the flower spray, between flower 2 & 3. Duplicate & place towards the end of the flower spray.
13 – resize by 30%. Place between the yellow flowers.
3 – resize by 15%. Place between the top & middle frame. Duplicate & place between the middle & bottom frame.
7 – resize by 50%. Place to the top left corner of the top frame.
103 – resize by 30%. Place to the bottom right.
90 – resize by 35%. Place to the bottom of the tulips.
101 – resize by 40%. Place to the bottom left.
18 – resize by 20%. Place to the left of the basket.
49 – resize by 15%. Place to the bottom right of the lantern element.
15 – resize by 20%. Place towards the top, a little to the left.
36 – resize by 95%. Paste as a new layer.
Now open element 37. Use your freehand selection tool & create a selection around the tube. Copy & paste as a new layer above the mask layer. Flip horizontal & arrange over the mask layer. On your mask layer, select all, float, defloat. On the tube layer, selections invert & press delete. Deselect.
Duplicate your tube & set the blend mode to screen. On the original tube layer, set the blend mode to luminance (L), 32.
Paste your tube again, this time just below the frames layer. Place her face inside the frame. On the paper layer, select all, float, defloat. On the tube layer, selections, invert & press delete. Deselect. Repeat for the other 2 frames. I chose to change the direction of the tube in the middle frame. Once done, merge the 3 tube layers together. Duplicate, set the blend mode to screen. On the original merged layer, lower the opacity to 32.
Add your name, copyright, & license info. Apply a drop shadow of choice to your layers, then merge visible. Save as a png.
Thanks for checking out my tutorials.


0 people loved this post!:
Post a Comment