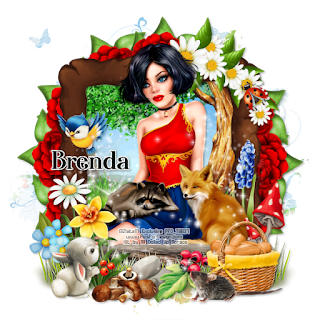
This tutorial was written by me on March 29th, 2020 and is my own creation. Any resemblance to any other tutorial is purely coincidental and unintentional.
PSP Version used: PSP 2019
This tutorial assumes you have a good working knowledge of PSP.
Supplies:
Tube of choice. I am using an exclusive from ZlataM. You can find it here.
Kit from All Dolled Up called Riding Hood
You can purchase it here.
Mask 363 by Vix. You can find it here.
Font of choice. I am using Afterglow.
Filters: Mura Meister Copies
-------------------------------------------------------------------------------
Open Element 150. Set the canvas size to 600 x 600 px. Resize by 85%, all layers unchecked.
Open your mask & paper 9. Resize your paper by 75%. Paste your paper as a new layer onto your frame canvas. Move below the frame layer, then apply your mask, merge group.
On your frame layer, use your magic wand & click inside the frame. Selections, modify, expand by 10.
Open Paper 2 & resize by 62%. Paste your paper onto your frame canvas. Selections, invert & press delete. Deselect & move below the frame layer.
Open Element 126. Resize by 40%, flip vertical. Paste as a new layer. Free rotate, 90, to the right.
Mura Meister Copies, Encircle preset, change the X & Y to 60. Click ok. Move this layer to just above the mask layer.
Open Element 15. Resize by 25%. Paste as a new layer above the leaves layer. Repeat the Mura Meister Copies.
Now let’s add our remaining elements:
23 – resize by 50%, rotate right. Paste as a new layer above the frame layer. Place to the upper right corner of the frame. Rotate a little to the right so it is hugging the corner of the frame more.
130 – resize by 12%. Place on the flower spray.
135 – paste as a new layer.
58 – resize by 40%. Place to the bottom left.
67 – resize by 50%. Place to the bottom right.
35 – resize by 40%, flip horizontal. Place to the bottom right.
7 – resize by 30%. Place to the bottom of the blue flowers, a little to the right.
25 – place to the bottom.
104 – resize by 30%. Place to the bottom.
64 – resize by 25%. Place to the right side of the rocks.
13 – resize by 30%. Place to the bottom of the red mushrooms.
56 – resize by 40%. Place a little down & to the right of the daisy.
129 – resize by 25%, flip horizontal. Place to the bottom left of the daisy.
59 – resize by 35%. Place to the bottom of the basket.
2 – resize by 25%, flip horizontal. Place to the bottom of the daisy.
11 – resize by 20%. Place to the left.
75 – resize by 25%. Place to the bottom of the rocks, a little to the left.
19 – paste as a new layer.
Open your tube, resizing as necessary. Paste as a new layer above the first sparkle layer. Center over the frame. Erase any part of the tube that extends beyond the log at the bottom.
Add your name, copyright, & license info. Apply a drop shadow of choice, then merge visible. Save as a png.
Thanks for checking out my tutorials.


0 people loved this post!:
Post a Comment